ApaBoard 2.2 sensor module
apaBoard v2.2 Sensor module
<tabs> <tab name="Összefoglaló" style="background:lightgreen;">First tab.</tab> <tab name="Leírás" style="background:lightgreen;">Second tab.</tab> <tab name="Kapcsolási rajz" style="background:salmon;">Third tab.</tab> <tab name="Videó" style="background:royalblue;">Fourth tab.</tab> <tab name="Forráskód" style="background:royalblue;"></tab> <tab name="Alkatrészek" style="background:royalblue;"></tab>
<tab index="1">This is a seperate tab. It demonstrates what happens if a tab has no inline or block attributes defined. If the tab contains a lot of text, it will automatically be forced to a new line, despite extra space being available at the end of the previous line.</tab>
<tab index="2">This seperate tab isn't forced to a new line, since it's short enough.</tab>
<tab index="3" inline>This is a seperate tab that has an inline attribute defined. It will fit in with the text as normal text would, and it fills up any space that is left available after the previous line. This makes tabs with inline attributes a bit better at fitting in with the flow of text.</tab>
<tab index="4" block>Despite fitting on the previous line, the block attribute forces this seperate tab to a new line</tab>
<tab index="5" block> Forráskód </tab>
<tab index="6" block> Alkatrészek</tab>
</tabs>
LM393 The Voltage Comparator
<tabs> <tab name="Összefoglaló" style="background:lightgreen;"></tab> <tab name="Leírás" style="background:lightgreen;"></tab> <tab name="Kapcsolási rajzok" style="background:lightgreen;"></tab> <tab name="Video" style="background:lightgreen;"></tab>
<tab index="1">Sok kísérlethez használható komparátor IC</tab>
<tab index="2">A potenciométerrel beállított feszültség értéknek megfelelően kapcsol. Számos kísérleti modul része, ezért általánosítani lehet a használatát.
Infrared Obstacle avoidance sensor: one infrared transmitter and one receiver, the receiver can detect the distance to the obstacles as a analog value and LM393 collect and compare this analog value and output digital value.
TCRT5000 Infrared sensor: Same working principle as the infrared sensor above, but the transmitter and receiver is integrated. Performance is also better.
Microphone sensor: Sound is sensing by the microphone, and send to the LM393, the analog output is not supported for this one, but it still output the digital value to see if the sound is detected or not.
Photosensitive photocell sensor: Light intensity is sensed here by the photocell sensor, the sensor itself output the a analog value, and the LM393 IC here works same to generate a digital output.
Soil Sensor: The sensor itself detects the moisture of the soil, LM393 works same in this case.
Water Drop sensor: the water drop sensor board itself detects how many water drop on the board, when a certain value comparing to the potentiometer is reached, then the LM393 will be trigger in the same way.
To see how to use LM393 IC, here is some schematics based on the sensors describe above, a lot of parts are the same, only a few parts changed around the sensor.
</tab>
<tab index="2">A poenciométerrel beállított feszültség értéknek megfelelően kapcsol </tab>
<tab index="3">
 |
 |
 |
||
 |
 |
 |
</tab>
<tab index="4">
Comparator
<videoflash>y0Q0ERSP24A</videoflash>
Peak Detector
<videoflash>ic_yEUV7Y3c</videoflash>
<videoflash>jllsqRWhjGM</videoflash>
Op amp
<videoflash>TQB1VlLBgJE</videoflash>
<videoflash>7FYHt5XviKc</videoflash>
</tab> </tabs>
SS49E - Hall Sensor - Linear Analog
<tabs> <tab name="Összefoglaló" style="background:lightgreen;"></tab> <tab name="Leírás" style="background:lightgreen;"></tab> <tab name="Dokumentáció" style="background:salmon;">Dokunemtáció</tab> <tab name="Videó" style="background:royalblue;">Videó</tab> <tab name="Forráskód" style="background:royalblue;"></tab> <tab name="Alkatrészek" style="background:royalblue;"></tab>
<tab index="1">Mágneses tér érzékelése </tab>
<tab index="2">
3-5V GND AO
Csatlakoztatni a
- VCC
- GND
- and “Output” egy Analog tüskéhez.
Az észak dél mezők láthatók a Serial ablakban
Output Type Sinking Sinking and Sourcing
gaussmeter
 |
 |
 |
</tab>
<tab index="3" inline>
PDF adatlap
SS49e_Hall_Sensor_Datasheet.pdf
honeywell.com
| nr | Modul | Típus | Csatlakozó | VCC | Kép | Ár/HUF | link | tutorial |
|---|---|---|---|---|---|---|---|---|
| 22 | Hall Sensor | Hall Sensor |
VCC GND Analog OUT |
3.3V - 5V | 
|
290 | ||
|
Részletek:   Gyártó HONEYWELL | ||||||||
</tab>
<tab index="4" block>
<videoflash>bnOd8f5Vev0</videoflash>
</tab>
<tab index="5" block>
/*
GaussPlot
27/12/2011  Arduining.com
Showing Gauss measured by the SS495B in the serial monitor.
(Miniature Radiometric Linear Hall Efect Sensor)
Sensor connected to Analog channel 0.
*/
#define XRANGE  50
int x,gss;
void setup(){
  Serial.begin(9600);
}
void loop(){
  int aValue =analogRead(0);
  x = map(aValue, 0, 1024, 0, XRANGE);
  gss = map(aValue, 102, 922, -640, 640);
  Serial.print("|");
  for (int i=0;i<x;i++){
    if(i==XRANGE/2-1)Serial.print("|");
    else Serial.print("-");
  }
  Serial.print("O");
  for (int i=x+1;i<XRANGE;i++){
    if(i==XRANGE/2-1)Serial.print("|");
    else Serial.print("-");
  }
  Serial.print("|");
  Serial.print(gss);
  Serial.println("Gauss");
  delay(100);
}
</tab> <tab index="6" block> Alkatrészek</tab> </tabs>
IR Sensor
<tabs> <tab name="Összefoglaló" style="background:lightgreen;"></tab> <tab name="Leírás" style="background:lightgreen;"></tab> <tab name="Dokumentáció" style="background:salmon;">Dokunemtáció</tab> <tab name="Videó" style="background:royalblue;">Videó</tab> <tab name="Forráskód" style="background:royalblue;"></tab> <tab name="Alkatrészek" style="background:royalblue;"></tab>
<tab index="1">Infra fény érzékelése </tab>
<tab index="2"> https://learn.adafruit.com/ir-sensor/using-an-ir-sensor
https://learn.sparkfun.com/tutorials/ir-communication </tab>
</tabs>
Rotary encoder switch
<tabs> <tab name="Összefoglaló" style="background:lightgreen;"></tab> <tab name="Leírás" style="background:lightgreen;"></tab> <tab name="Dokumentáció" style="background:salmon;">Dokunemtáció</tab> <tab name="Videó" style="background:royalblue;"></tab> <tab name="Forráskód" style="background:royalblue;"></tab> <tab name="Alkatrészek" style="background:royalblue;"></tab>
<tab index="2">
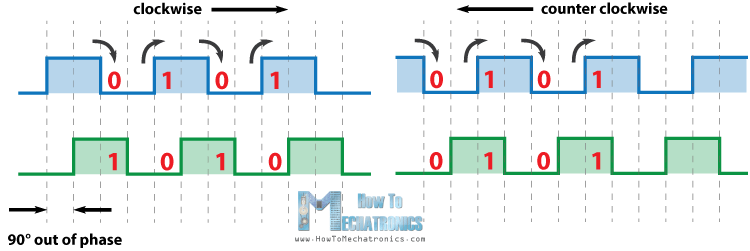
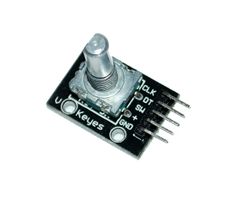
http://howtomechatronics.com/tutorials/arduino/rotary-encoder-works-use-arduino/
</tab>
<tab index="3">
 </tab>
<tab index="4"> <embedvideo service="youtube">https://www.youtube.com/watch?v=v4BbSzJ-hz4</embedvideo> </tab>
<tab index="5">
 /*     Arduino Rotary Encoder Tutorial
 *
 *  by Dejan Nedelkovski, www.HowToMechatronics.com
 *
 */

 #define outputA 6
 #define outputB 7

 int counter = 0;
 int aState;
 int aLastState;

 void setup() {
   pinMode (outputA,INPUT);
   pinMode (outputB,INPUT);

   Serial.begin (9600);
   // Reads the initial state of the outputA
   aLastState = digitalRead(outputA);
 }

 void loop() {
   aState = digitalRead(outputA); // Reads the "current" state of the outputA
   // If the previous and the current state of the outputA are different, that means a Pulse has occured
   if (aState != aLastState){
     // If the outputB state is different to the outputA state, that means the encoder is rotating clockwise
     if (digitalRead(outputB) != aState) {
       counter ++;
     } else {
       counter --;
     }
     Serial.print("Position: ");
     Serial.println(counter);
   }
   aLastState = aState; // Updates the previous state of the outputA with the current state
 }
</tab> </tabs>
Analog Multiplexer/Demultiplexer - 4051
http://playground.arduino.cc/Learning/4051
http://tronixstuff.com/2013/08/05/part-review-74hc4067-16-channel-analog-multiplexerdemultiplexer/
https://cityos.io/tutorial/1958/Use-multiplexer-with-Arduino
http://modelrail.otenko.com/arduino/multiplexing-photodetectors-to-detect-train-occupancy


